The Beard Trim Process Explained for Better Results

The beard trim process is the systematic routine of maintaining beard length, shape, and cleanliness through preparation, trimming, shaping, and ongoing care. Done correctly, it produces a polished look that complements your face and holds its shape between visits. Done wrong, it creates uneven lines, a too-short cut, and weeks of regret. This guide walks you through every stage of the process, from assembling the right tools to adapting your technique for your face shape, so you get consistent, professional-looking results at home.
What are the essential tools and preparation steps for trimming a beard?
A professional-grade grooming kit contains five core tools: a boar-bristle brush, a wide-tooth comb, small straight scissors, an adjustable-guard trimmer, and conditioning beard oil. Each tool serves a specific function. The boar-bristle brush trains hair direction and distributes natural oils. The wide-tooth comb detangles without pulling. The scissors handle stray hairs and mustache edges. The adjustable-guard trimmer controls bulk and length. The beard oil conditions skin and softens hair before and after trimming.
Pro Tip: A complete kit under $100 covers every tool you need for a professional-level trim at home. Spending more does not automatically improve results. Technique matters more than price.
Washing your beard before trimming is non-negotiable, but frequency matters. Washing 2–3 times per week with a beard-specific cleanser preserves natural oils and prevents dryness and breakage. Daily washing strips those oils and leads to itchiness and brittleness. Over-washing is one of the most common grooming errors men make without realizing it.

The single most important preparation rule: always trim a completely dry beard. Trimming wet hair leads to uneven cuts because damp hair stretches and then contracts as it dries. What looks even when wet will look shorter and uneven once dry. Wash your beard, dry it fully with a towel or low-heat dryer, then comb it out before you pick up the trimmer.
Combing before trimming does two things. It detangles the hair so the trimmer glides evenly, and it reveals the true length and direction of growth. Run the wide-tooth comb through the beard in the direction of growth first, then against it to lift the hairs. This gives you an accurate picture of what you are working with before you make a single cut.
How to trim your beard step by step for a polished look
The trimming process follows a clear sequence. Skipping steps or rushing through them is where most men go wrong. Work through each stage methodically and you will avoid the most common mistakes.
- Set your guard length conservatively. Start one guard size longer than your target length. You can always take more off. You cannot put it back.
- Trim with the grain first. Move the trimmer in the direction of hair growth to reduce bulk evenly across the full beard.
- Trim against the grain for uniformity. A second pass against the grain catches hairs the first pass missed and creates a more even surface.
- Define the neckline. Place two fingers above your Adam’s apple. That point is your neckline. Trim everything below it. Correct neckline placement sits two finger widths above the Adam’s apple and curves naturally along the jaw. Trimming above the jawbone creates a thin, disconnected look.
- Shape the cheek lines. Follow your natural cheek line rather than drawing an artificially sharp edge. Overly defined cheek lines look harsh and thin out the beard visually.
- Trim the mustache. Use scissors to trim any hairs that fall over the lip line. Comb the mustache downward first so you can see exactly which hairs need to go.
- Remove stray hairs. Use scissors to snip any outliers that the trimmer missed, particularly along the edges and under the chin.
- Check symmetry. Step back from the mirror and compare both sides. Multiple small passes with frequent symmetry checks prevent over-correction and uneven edges.
Pro Tip: Never commit to a single deep cut across the full beard. Make several short passes and check your progress after each one. This approach gives you control and prevents the kind of over-trimming that takes weeks to grow back.
Apply beard oil after trimming. It conditions the skin underneath, reduces post-trim irritation, and gives the beard a healthy finish. Work a few drops between your palms and massage it into the beard from root to tip.
How often should you trim your beard, and how does it vary by style?
Trim frequency depends directly on beard length and the style you are maintaining. Short stubble styles need maintenance every 3–5 days to stay sharp. Medium beards require a trim every 1–2 weeks. Longer beards need professional shaping every 2–3 weeks to maintain structure and prevent split ends.
The table below summarizes recommended intervals by beard length.
| Beard style | Trim frequency | Key maintenance focus |
|---|---|---|
| Short stubble | Every 3–5 days | Guard consistency, clean edges |
| Medium beard | Every 1–2 weeks | Neckline, cheek line definition |
| Long beard | Every 2–3 weeks | Shape, split ends, conditioning |
| Full professional style | Every 2–3 weeks | Professional shaping recommended |
Two signs tell you it is time to trim sooner than scheduled. First, the neckline has grown past your two-finger reference point. Second, one side of the beard looks noticeably fuller than the other. Both are signs that growth has outpaced your maintenance schedule.
Personal growth rate also affects frequency. Some men grow half an inch per month; others grow faster. Track how quickly your beard reaches the “needs trimming” threshold and adjust your schedule accordingly. A consistent routine beats a reactive one every time.
What are the common beard trimming mistakes and how to avoid them?
Most trimming errors come from rushing or from skipping the preparation steps. These are the mistakes that show up most often, and the fixes are straightforward.
- Trimming a wet beard. Wet hair stretches and appears longer than it is. Trimming it leads to a shorter result than intended once the beard dries. Always trim dry.
- Starting with a guard that is too short. Going shorter than your target length in the first pass is the fastest way to lose weeks of growth. Start long and work down.
- Setting the neckline too high. A neckline trimmed above the natural jaw curve creates the “chinstrap” look, which makes the beard appear disconnected from the face. The correct neckline sits two finger widths above the Adam’s apple.
- Over-defining the cheek lines. Razor-sharp cheek lines look unnatural and thin the beard visually. Follow your natural growth line and clean up only the obvious strays.
- Ignoring symmetry. Trimming one side more than the other is easy to do when you are focused on detail. Step back and check the full beard from a distance regularly throughout the process.
- Skipping beard oil. Trimming without conditioning afterward leaves skin dry and hair brittle. Beard oil is not optional. It is part of the process.
Pro Tip: If you notice one side looks shorter mid-trim, stop. Do not try to even it out by trimming the other side shorter. Give it a few days and let the shorter side catch up before trimming again.
How to adapt the trimming process for your face shape and desired style
Matching beard geometry to face shape is the difference between a beard that looks intentional and one that looks accidental. The trimming technique stays the same, but where you add length and where you keep things tight changes based on your face.
- Round faces benefit from extra length at the chin and tighter sides. This creates the illusion of a longer, narrower face.
- Square faces look better with softer edges along the jaw and a slightly fuller chin. Sharp angles on a square face can look severe.
- Oval faces are the most versatile. Most beard styles work well. Focus on maintaining clean lines rather than compensating for geometry.
- Oblong faces benefit from fuller sides and a shorter chin to add width and balance the length.
The distinction between trimming and shaping matters here. Trimming manages bulk and length; shaping creates structure and defines the lines that frame your face. Professionals perform both sequentially. At home, most men only trim. Adding a shaping step, even a basic one, produces a noticeably cleaner result.
Training hair direction with a low-heat dryer and brush produces a more lasting shape than product alone. Blow-dry the beard in the direction you want it to grow while brushing it into place. Done consistently after washing, this method physically redirects growth over time and makes your trim hold its shape longer between sessions.
Key Takeaways
A consistent beard trim process, built on dry trimming, correct neckline placement, and gradual shaping, produces clean, professional results that hold their shape between sessions.
| Point | Details |
|---|---|
| Always trim dry | Wet hair stretches and contracts, causing uneven length after drying. |
| Start with a longer guard | Begin one size above your target to avoid cutting too short on the first pass. |
| Neckline placement is critical | Set the neckline two finger widths above the Adam’s apple for a natural look. |
| Trim and shape are different steps | Trimming controls length; shaping defines lines. Both are needed for a polished result. |
| Match beard style to face shape | Round faces need chin length; square faces need softer jaw edges for balance. |
What 20 years behind the chair taught me about trimming
The biggest mistake I see men make is treating the beard trim as a single action rather than a process. They pick up the trimmer, run it through the beard once, and call it done. That approach produces a shorter beard, not a better one. A real trim has stages: preparation, bulk reduction, neckline work, shaping, and finishing. Each stage depends on the one before it.
The neckline is where most home trims fall apart. Men trim it too high because it feels cleaner in the moment. But a neckline that sits above the jaw creates a floating beard that looks disconnected from the neck. Two fingers above the Adam’s apple is the reference point every time, no exceptions.
Patience is the skill that separates a good trim from a great one. Multiple short passes, frequent symmetry checks, and the discipline to stop before you go too far. I have seen men try to fix an uneven line by trimming the other side shorter, and then shorter again, until there is almost nothing left. If something looks off, put the trimmer down and give it a day. You will see it more clearly with fresh eyes.
Invest in quality tools and use them consistently. A good adjustable-guard trimmer and a bottle of Philly’s beard oil will take you further than any shortcut. The routine is what builds the result.
— Stephen
Professional beard trims at Phillythebarber in Copenhagen
At-home trimming keeps your beard maintained between appointments, but professional shaping takes it to another level. Phillythebarber, led by certified Master Barber Philly with over 20 years of experience, offers beard trims, straight razor shaves, and personalized grooming consultations in Copenhagen.

If you are ready to see what a professional trim can do for your beard, the 2026 Copenhagen beard trim guide covers everything you need to know about booking a session and what to expect. Phillythebarber also carries a full range of beard grooming products including beard oils and professional trimming tools to support your at-home routine between visits.
FAQ
What is the correct order for the beard trim process?
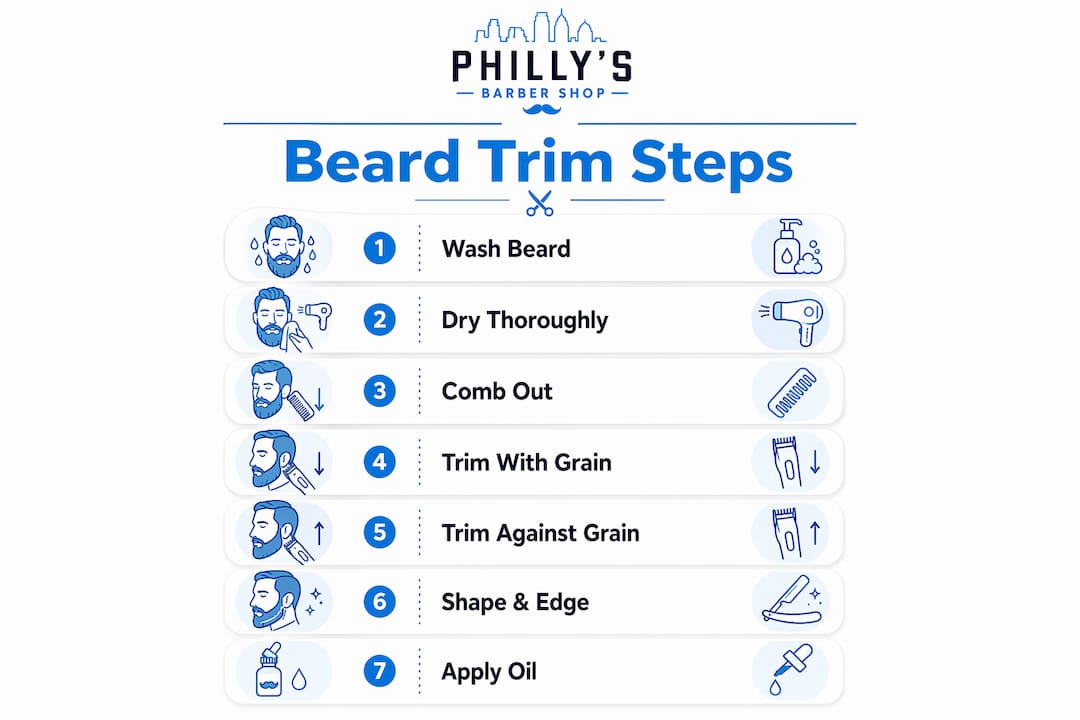
The correct order is: wash and fully dry the beard, comb it out, trim with the grain to reduce bulk, trim against the grain for uniformity, define the neckline and cheek lines, trim the mustache, remove strays with scissors, and finish with beard oil.
How often should you trim your beard?
Short stubble needs trimming every 3–5 days, medium beards every 1–2 weeks, and longer beards every 2–3 weeks. Personal growth rate affects the exact schedule.
Why should you never trim a wet beard?
Wet hair stretches and appears longer than it actually is. Trimming it leads to a shorter result once the beard dries, which often means cutting more than intended.
Where exactly should the beard neckline sit?
The neckline sits two finger widths above the Adam’s apple and curves naturally along the jawline. Trimming above this point creates a thin, disconnected appearance.
What is the difference between trimming and shaping a beard?
Trimming controls bulk and overall length. Shaping defines the structural lines, including the neckline and cheek lines, that frame the face. Both steps are needed for a complete, professional-looking result.